26 August 2010

Space Nails/ Madness!/ Angry Paint Splattered Painting

Just as a side note, I also added a form spring on my side bar so feel free to ask me any questions!

After reading Asami's Space Nails manicure, I made an attempt to re-create her masterpiece.

chanel's blue stain

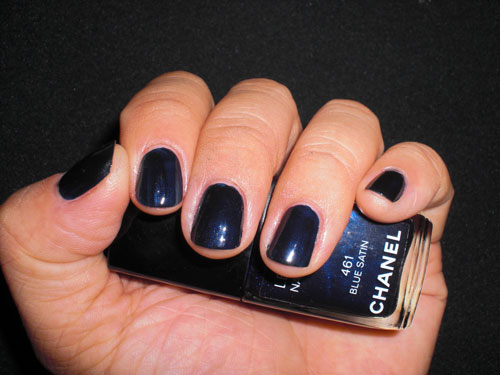
Since I don't have any black nail polish, I used Chanel's Blue Satin (which is the darkest nail polish I own). It is an extremely sexy color with shine and glitter.

Chanel Blue Satin close-up

I also took a close-up picture just to show what the color really looks like. I know this isn't really a great photo, but this will do.

space nails

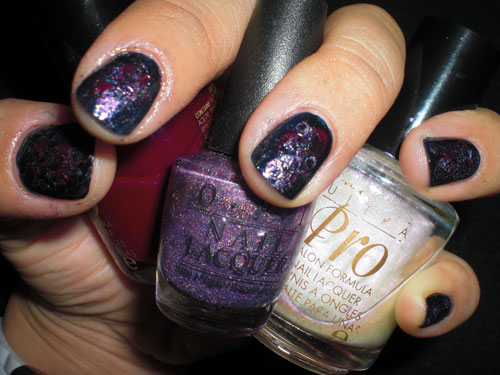
So I didn't realize how much polish had gotten on my cuticles! Sorry for the dirtiness! I used an OPI glittery/shimmery purple color for the first layer. I'm not sure what the color is called because it was from one of those sample packs that I got as a gift. But it is a really pretty color. Then I used Nina Ultra Pro in Electric Rainbow and Molten Opal. I used all 3 of these colors to help create the spaciness. I didn't use any nail embellishments because I don't have any that resemble stars so I just left it as it is. But I might purchase some later on in the week just to reach the maximum effect.

space nails

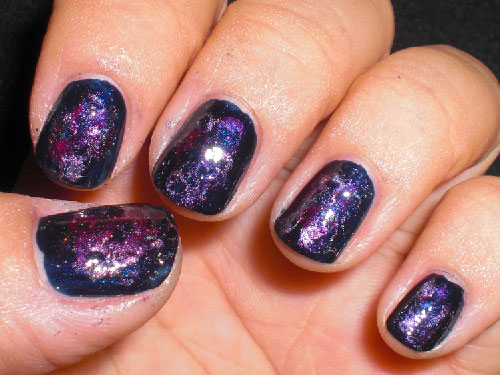
Here is the final product! Although it does not look as good as Asami's, I had fun trying to attempt it! I'm calling it Space Nails/ Madness!/Angry Paint Splattered Painting because (1) it looks like madness (2)sorta looks like space and (3) reminds me of an angry paint splattered painting.

What do you think?

14 August 2010

Moccasins with a personal twist!

I know it has been a while since I last posted, but with good reason! I have been keeping myself busy with another project!

I was browsing around Michael's one day and came across a DIY: Moccasins kit. I thought it would be something fun to keep myself busy with. It was about $15.99, but since I had a coupon it only cost me about $10 dollars or so with tax.

mocs1

This is what the kit came with:

moc2

When completed:

mocs-before

Upon completion, I felt that the final project lacked serious character and wanted to do something more. After browsing through much online tutorials and YouTube videos, I came across Katie's Darlingtonia Moccasins. This was just the inspiration I needed. Although love her Moccasins very much and would LOVE to purchase one, I don't have the financial means to do so as of now. But I will be purchasing a pair in the near future.

I drove back to Michael's again in hopes of searching for something that would give my Moccasins what it needed and I found this:

string

Who would have known that leather jewelery would go a long way!

mocs-side

I added some embellishments so it wouldn't look so plain. These beads were sitting in my arts and crafts bin for a long time and figured it would be the perfect opportunity to use them.

mocs-facedown

A side view of the Moccasins.

moc-closeup

As you can see, the stringing on the left Moccasin is different from the right because I ran out of string and didn't want to go buy more if I only need such a small amount. Kevin suggested that I put a charm on the back of only one shoe to make it unique and I do say that it looks good.

moc4

So here you have it, a completed Moccasins project. I hope this will inspire you to go out and make your own or to purchase one from Katie because her Moccasins rock!


Photobucket


*Side Note*: I also wanted to mention that these Moccasins kit didn't have soles on the bottom of the shoes, so I went to a local shoe repair store and had one slapped on.

05 August 2010

Back from Vegas...Part 2

First of all, thanks for all your lovely comments from my pre-vacation post. :)

Second, good news! My camera showed up in Kevin's room. That was a huge relief for me since many of my photos were stored in the camera. I'm one of those people that are too lazy to transfer photos into their computers and will only do so when there is no more storage room.

Anyways, one of the few things I love about Vegas is:
  • A chance to get away from LA
  • Great food - Buffets
  • The Shoppping
I also visited the Pawn shop from History Channel's Pawn Stars. Sadly they weren't there because it was a weekend after all and who would want to work on weekends anyways. However, what was cool was that I was able to see some of the items that were featured in their episodes!

Sadly, I didn't get to take much photos from trip. I only got pictures of dessert, YES--DESSERT! from the M Resort's Studio B Buffet. It was so good! I cannot help myself when it comes to dessert, even though I'm lactose intolerant! and Yes, I tried every one of those. I was a happy fatty that night!

CIMG4005

CIMG4011

CIMG4007

Back from vegas...

So I've been back...for a while. I decided to give myself a little break from blog world and guess what happened? I became unmotivated and lazy again! So I am back once again! I will do a proper update because I seem to have misplaced my camera!!! I know its somewhere in the house!