Showing posts with label nail polish. Show all posts

11 February 2011

Swift Cheetah Manicure Tutorial

I have a simple nail design tutorial for you today! My apologies, I have been busy for the past few weeks. The weekends are the days I really get to rest and believe me, I do rest and get lazy!

Swift Cheetah Manicure

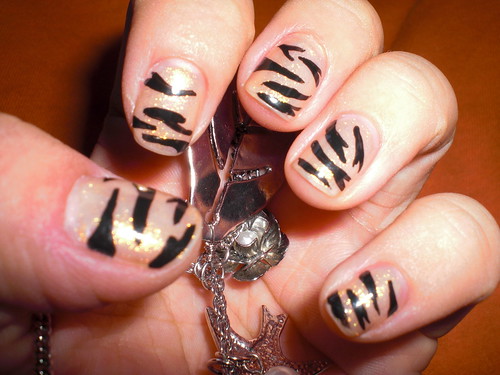
I did this manicure a while ago, but never got the chance to post it up. I love having animal prints on my nails.The pros are that it is completely vegan and there is no hurting of animals involved! Yeah, I know I'm a nerd. :) I also did a fierce tiger nail design sometime last year if you want some more ideas for animal print manicures.
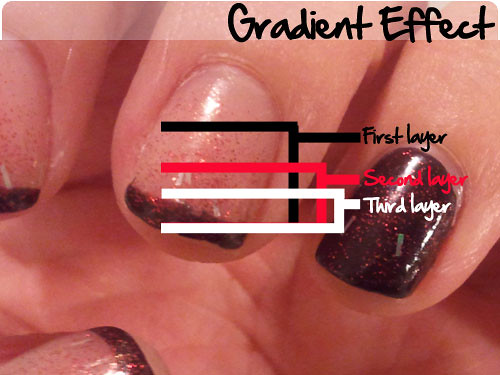
Swift Cheetah Manicure
Step 1:
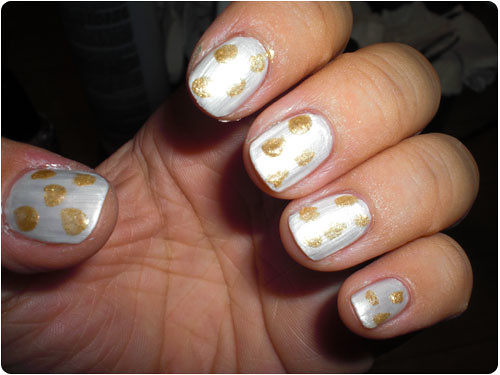
First start with a base color. I used Elf's Pearl, which is a shimmery white that almost looks silver. In my opinion, it is not a great color to use by itself, but great for nail designs.

Swift Cheetah Manicure
Step 2:
Add some random dots which will serve as the Cheetah's spots. I used Rimmel's 521 Dazzle ( I think that is the name). It is a gold glitter, which I also use primarily for nail designing as I find the color too overwhelming.

Swift Cheetah Manicure
Step 3:
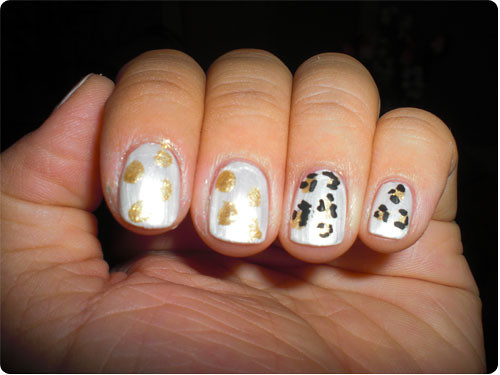
Then add another set of random dots (about 3 as shown in the picture) around the gold dots. I used a black striping paint. You can also use black polish, but use it sparingly as you don't want too much polish on the brush when you're dotting. Just remember that these dots do not have to be perfect circles as we want to achieve an organic look.
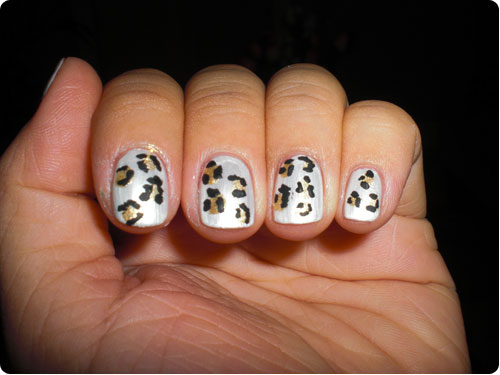
Swift Cheetah Manicure
Step 4:
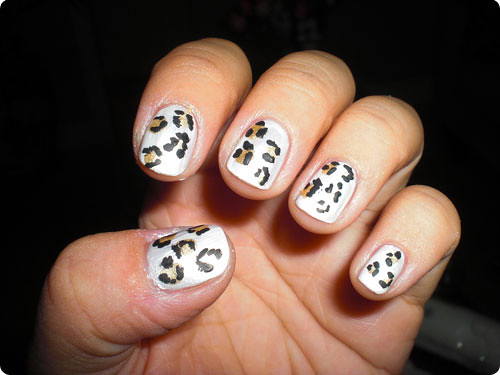
This is the completed look after all the dots have been applied.

Feel free to play around with a color scheme. I just chose to use gold and black to achieve a realistic Cheetah look. Was the tutorial easy to follow? Please tell me what you think. :)

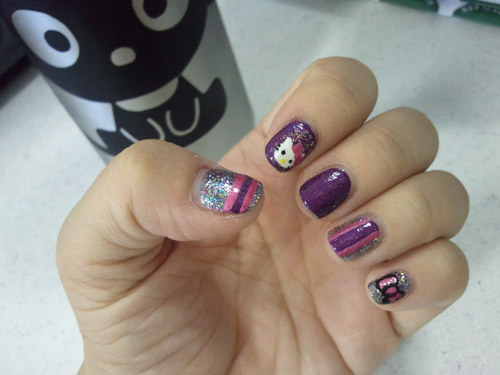
*Special shout out to Kat. I love the color combo of polishes you put together! Let me know when you're back in town and I'll "Hello Kitty" those nails for you! :) *

25 January 2011

Dark Red French Tips with Red Glitter (Gradient Effect) with a small tutorial

I want to clarify something first: the integrity of this manicure and condition of my hands greatly diminished as I was taking these photos. I underestimated the drying time of the top coat before smashing my hands into my boxing gloves for my Boxing class. Since I have sensitive skin on my hands, all that punching reeked havoc on them. Please bear with me. :(

After seeing several of 'Chelle's French tip gradient manicures: here and here. I was feeling quite inspired to create my own without having to purchase any new polish! I decided to sorta make a small tutorial just in case there would be any questions as to how I did the gradient effect.

I decided to take pictures with flash and without flash because as you know, flash makes a huge difference on the actual color of the polish and the manicure as a whole.

Nail Design with Flash

Black French Tip with Red Glitter
  • Dark Red French Tips (looks black): OPI's Midnight in Moscow (Swiss Collection). This is an extremely dark red color when it is in the bottle. I noticed that when I painted it on my nails, it was more of a black with red glitter in it.
  • Red Glitter : Ozotic's 203 (which I got from 'Chelle from our Swap. Thanks again!). This is sheer red glitter with silver strips? or flakes? Not sure what they are called. Very pretty color though.
  • Nude Glitter: Essie's Cool-Lots. I totally forgot to include this polish during the photo shoot! It is an extremely sheer nude glitter polish which I mainly use as a polish topper.
polisheswithflash

As you can see with the flash, you get a better picture of how dark the OPI Midnight in Moscow is. But with the flash, the red of the Ozotic Pro 203 is just a little too bright.

OPI Midnight in Moscrow & Ozotic Pro 203
However, without the flash Midnight in Moscow looks reddish-brown and 203 is more on par with what the color really looks like.

ozoticzone_flash

This is just a close up of Ozotic Pro 203, you can see the little silver strips/flakes which I must say is what I love about this polish (besides the fact that it is a glitter polish). As you can see, the flash makes the red super bright!

Now here comes the small tutorial: How to create the "Gradient Effect".

How to do the Gradient Effect

So what I did here was create guidelines to show where you are suppose to apply the glitter polish. They are pretty self explanatory: first layer goes on first (black area), second layer goes on second (red area) and third layer goes on last (white area). Make sure to let each layer fully dry before applying!

I hope that small tutorial made sense! You can easily re-create this look any sheer glitter polish for your French Tip manicures. Let me know if this works out for those of you who tried this small tutorial!

Thanks to 'Chelle for the Ozotic Pro 203 and the inspiration to create this manicure!

22 January 2011

Purple and Pink Manicure

I have been super lazy when it comes to my blog. I've been working on a lot of mini projects to relieve some of the stress from work and my research projects. I guess you can say that it helps me from going crazy and pulling out my hair. :)

I'm at 48 posts since I've started this blog. I'm thinking about doing a giving away when I reach 100 posts or MAYBE 50 if I'm motivated to, so stayed tune! :D

This is a quick and simple manicure I did because I was feeling lazy. :) I used my new polishes I kindly received from 'Chelle from Cosmetic Cupcake from our Swap!

Purple & Pink Manicure!

Purple & Pink Manicure!
  • Purple: Ulta3's Pearly Grape (which is the perfect color I've been searching for!)
  • Pink Glitter: Ozotic Pro's 601. There isn't a color name for it, so I assume that they label their colors by numbers because the red gliter of Ozotic Pro I also received from 'Chelle is also labeled by a number. This polish is a somewhat concentrated glitter polish so it wasn't as clear as I through it would be but it is nonetheless a beautiful color!
It was nice to try another brand of polish that I wouldn't be able to purchase here in the states. But thanks once again, 'Chelle because if it wasn't for you, this post would have never existed. :)

What do you think?

08 January 2011

Swap! with 'Chelle from Cosmetic Cupcake

I was able to do a nail polish swap with the lovely 'Chelle from Cosmetic Cupcake. I had a pleasure getting to know her through our love for nail polish and blogging. She is such a sweet gal with so much talent in nail art. I was really fortunate to be able to do a swap with her because I knew she was already doing so many other swaps with fellow bloggers. So, Thanks to 'Chelle for swapping with me! I really appreciate it! :)

Here are all the goodies she sent me! I was so excited to receive so many Aussie polishes that I'm not able to purchase in the States here.

I've actually been wanting to try Ulta3 ever since I saw it featured on 'Chelle's blog. She sent me purple colors, one of my favorites!

I was also able to receive wonderful selection of greens and glitters!

I was so excited when she sent me a bottle of BYS cracked polish because I've been wanting to try it ever since I saw her post about it! Now I have a bottle of my own. :)

She also sent me a wonderful selection of yummy candies and cute nail stickers!

Although I wasn't able to make a comment on each bottle of polish featured here, just know I love them all! Such wonderful colors which are now part of my nail polish collection. :)

Thank you so much 'Chelle for your wonderful package and for swapping with me! It was a lot of fun.

20 November 2010

Hello Kitty Manicure

I've been away from the computer for awhile. Since I have email access on my mobile device, I seldom use the computer now. :(

Here is a Hello Kitty manicure I did, although she is not my favorite Sanrio character. She is nonetheless a beloved icon.

Hello Kitty Nail Art!

I know it looks a bit excessive, but this was done at the spur of the moment. Since I use to work for Sanrio, I figured such a gawdy look would be appropriate for a Hello Kitty manicure (pink, purple and glitter/sparkles-I kinda thought about shiny stickers). I didn't use red because it is a traditional Hello Kitty color and I wanted to do something different.

The purple I used was from Color Club's Wild at Heart . The glitter polish was used from OPI's Burlesque Collection; I used Show it & Glow it! and Sparkle-icious. The pink was nail art paint I bought from Sally's Beauty Supply, used for the stripes and bows. The black and white paint I used for the Hello Kitty face was acrylic craft paint.

Unfortunately I wasn't able to take a photo of the other hand before I took the nail design off. It was less excessive, more plain and much nicer. I had to go to a wedding so I figured it wouldn't be appropriate to wear to a wedding.

Tell me what you think! :)

24 April 2010

Konad Nail Stamp

One of my current and long time obsession is nail polish + nail designs. I've had my eye on Konad which are basically nail stamps. Yes, you heard right & this post is for you 'Chelle!. You need a special stamper and the image plates. The plates are stencils and the stamper acts as a medium to transfer the image on to your nail. I haven't had time to do a proper manicure so I can't show any examples and or designs. But I will soon, I've just been so swamped with school work. :( There are tons of videos and images you can find all over the web, Asami and 'Chelle has great examples of Konad designs + nail designs as well.

I wanted to make things fun by adding macarons & yes, they are from the lovely Katrina! :)

konad

konad

Thanks to Katrina for her freebies! :)

25 March 2010

Fierce Tiger Manicure

I AM OFFICIALLY ON SPRING BREAK AND BOY DOES IT FEEL GOOOOOOOODDD! :D. Sorry, but I had to let that out. :)

Anyways, moving on...


So, I decided to be fierce today and do a tiger print nail design, inspired by my nail design guru, Asami. She did a tutorial on this awhile back, but I never had the time do it because of school work and such. So now that I have the time, I was very impressed with how it came out. I've done a zebra print design before but i really like the tiger print because there is so much more color to it than just the bland "black and white".

In order to achieve this look I used two coats of a semi-sheer nude color from Essie's Vanity Fairest and then another two coats of a sheer glitter orange OPI's Goldilocks Rocks! I decided to use two coats of the sheer glitter because it was so thin and figured that another coat wouldn't hurt. For the stripes, I used acrylic paint from Micheal's (So much cheaper compared to the nail design paint from Sally's, I got on sale 2 for $1, but they usually are 59 cents. Plus you get a 2oz bottle, more bang for your buck. I originally got this idea from Asami who uses it to do her nail art. Very creative to use acrylic paint, I would have never thought of it.

I thought that using the glitter orange color would make the design look tacky, but it was the only orange color I had and I didn't want to go out and buy an orange color that I'm gong to rarely use. However, I was really surprised how well it came out. Wasn't as flashy as I thought it would because, because the black stripes helps deviate attention from the glittery base color. Overall, I am very pleased with how it came out. :)

25 February 2010

Valentines' Day Inspired Manicure


This is manicure I did for Valentines' day. I know the integrity of the manicure is bit worn out as I had been wearing them for a week before I took this photo. It is something simple and not too complicated.

I used a swatch from OPI's Hong Kong collection, Meet Me on the Star Ferry. It is a purple shimmer, absolutely stunning. Not to mention my favorite as well! I applied two layers on to the tips for optimum color. Then I applied another two coats from Essie's Cool Lots. It is an extremely sheer peach nude color.

I usually free hand the designs on my nails but I was feeling quite lazy that day. Since my sister is into scrap booking, I took one of her heart shaped paper stampers and punched out a small heart. The paper I used was somewhat thick and sturdy so I applied some water to soften it. While my nails were still wet from the Cool Lots coat, I applied the heart punch out. As it dried, I applied top coat and especially on the thumb to reinforce the heart.

Thanks to my muse, Asami for inspiring this design! :)